Thursday, December 12, 2013

My Life as a Twenty-Something Robot

Hey-o!

So ya'll may be wondering why I haven't posted anything in pretty much forever. The answer is, astoundingly, I haven't finished anything in forever....

As you may or may not know, I happen to be a college student and planning a wedding set to happen next fall. And my wonderful fiance just accepted a job as an artist for an agency in Hollywood (Yay Erik!) which means now we're going to also be moving on top of everything.

Understandably (I hope) thanksgiving vacation was insane this year and then finals started happening and, well, you get the picture. I would be working on new things except.....my workspace currently looks like this:

Supposedly a desk is in there somewhere...

Yes, that is my bra on the ground, deal with it.

I'm pretty sure I have a problem.

Yes, I am a total wreck at the moment. There is no excuse, but the evidence is right in front of my face. Another reason I'm so behind is that Monster High Dolls went on sale over the black friday part of the Holiday. And I of course thought 'custom monster high dolls? That's a thing I could do!'
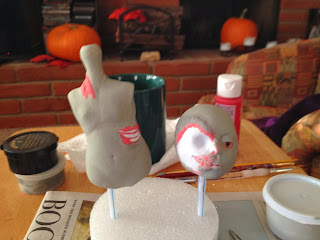
Which resulted in this:


A half-finished X-men Mystique doll. I could go on and on about the dozens of unfinished projects I have laying around, but really if you look at those messy pictures you can already see each and every one of them. Plus there's the needle-felting I have been doing but not posting about...


Yay for needle felted pokemon!

But seriously, I need to get myself organized for the new year. Badly. So please excuse my absence from the internet world lately, I'm doing my best to rectify it. Give me this week to just organize my mountain of neglected projects and hopefully new stuff will start happening again soon. Until then enjoy the posts of treasures I found while digging through my mess heap.
Maybe I'll get some of them posted in the Lee's Menagerie store.

Dutifully Yours,
Stefani Lee


Monday, December 2, 2013

Jewelry Experiments

Happy Monday Everyone!

Hope the holidays treated ya'll well, mine were a bit crazy but we made it through! I have a bunch of projects in the works right now, but I thought I would shift gears and talk a little about my biggest seller: faerie wing jewelry. 


This isn't going to be a 'how its made' or anything like that, really just a little blurb to let everyone know what I'm up to this week. The necklaces and earrings are actually my main source of income, and I supply 3 boutiques in the area at the moment: The Hummingbird and the Honeybee in Thousand Oaks, Salem Magic in Simi Valley, and the Rabbit Hole Cafe in Agoura Hills.

Additionally I'm going to be in couple holiday craft and jewelry sales over the next few weeks. Yay! The first of them is the Moorpark College Ceramic Sale this coming Wednesday and Thursday. In preparation I decided to toy around with some new styles of necklace. I thought I'd post a little sneak peak at some of the different styles I'm going to have at the sale. These pieces all have a mix of metals and some sort of fabric as well as wire wrapping all done by me. I hope you enjoy, and if you're local be sure to stop by the ceramics sale at Moorpark College December 4th and 5th!


Best Wishes for the season,
Stefani Lee


Monday, November 25, 2013

Making Dragon Art Dolls

Happy Monday Everyone!

I just finished a pair of Chinese Lung dragon dolls this last week, and I thought I'd post a little behind the scenes action here. The dolls are up for sale on my etsy shop: Lee's Menagerie. Here's what they look like finished!

And now a little peak at how I made them.
The dolls started as just wore armature held together at points with small balls of clay. I beefed up the head and body with aluminum foil so I had the right shapes underneath and then I wrapped it up in floral tape to keep everything in place. After all that, I cut strips of old fabric and wrapped them around the body to form shape and give softness.


The next thing I did was add the base layers of paperclay to start forming the head and feet. After the base is dry I add more paperclay and start sculpting the details: horns, claws, scales, ect. This is also when I carve out the eye sockets and position the eyes.


Now it's painting time! I coat the clay with a base sealer that includes acrylic color, gesso, and modeling paste. The dragon gets about 3 coats of this. Then I start applying a base color of acrylic paint. This base color happens to be red.


Then I put the secondary base color on the scales (kind of a mustard yellow this time).


The next step is to go in with a highlight color and make those flat base colors really pop! This is my favorite detail brush, I use it for everything. I got it at ooakartistemporium.com


Looking pretty good! After the paint is dry it's time to seal everything with a couple coats of ceramic sealer. This makes my eyes kinda gross, so i like to go back in and use nail polish remover to clean off any lingering paint or sealer residue. I also like to use a little shiny topcoat on the dragon's nails.


The last (and hardest part) is attaching the fur. I like to cut out squares and the shape them around the body as I glue the fur on, but it's a fiddly process and I think everyone does it differently. You'll just have to experiment and see what works for you. I do glue my fur on with oodles of fabritac glue instead of sewing a body-sock for my creatures. That approach really only works if you have a fairly solid cloth body. If you're planning on using stuffing you're going to have to sew your body together.

But after lots of work, you have a super cute finished dragon!


I hoped you enjoyed this installment of 'how its made'. More posts on my needle felting experiments later in the week and a new adventure journal entry all coming soon!
Once again, the dragons are for sale in my shop Lee's Menagerie if you are interested in adopting one.

Stefani Lee


Thursday, November 21, 2013

Needle Felting Anyone?

Holy Goodness Sauce Batman!


So I have discovered needle felting and I think I may be in love. My wonderful artistic grandmother Lee Daniels introduced it to me and my sister over this last weekend and I can't stop thinking about making little wooly creations. I'm completely obsessed.

I mean, have you seen this stuff? Here's one of my favorites by flightofheart on etsy:

Life-sized american kestrel doll?? Too amazing.

Or how about this dragon by AliceFelts:
I don't want to alarm anyone, but I'm pretty sure I NEED this dragon. I'd be honor bound to buy it if there was a little more color, but the detail work on this is stunning.

And lastly MarchHareCreations with the most awesome griffin plush:

Needless (needle-less?) to say I went ahead and ordered a starter kit of assorted felting needles and some delicious wool ASAP! Anyone else looking for a great website to order from, I like Felt Alive personally. Even though the website is a little...shall we say 90's chic? She has wonderful prices and a great selection.

Anyway, my wool and tools aren't here yet but expect to see lots of felting experiments on the instagram feed (leesmenagerie) and the tumblr (Creatures of Lee's Menagerie) hopefully this weekend. I'm thinking....pokemon. Lots of mini-pokemon dolls for practice.

Faithfully Yours,
Stefani Lee


Tuesday, November 19, 2013

Collecting Curiosities

Happy Tuesday Everyone!

Just wanted to post a little something about my current obsession- Curiosity Cabinets! Back in the 1800-1900s it was popular for adventurous types to keep a display in their homes of curious items they collected in their travels. Some of these items included rare plants, exotic animal parts, medical oddities, and artifacts from other cultures.

Personally, I want to create my own curio that is one part magical creature specimens, and one part witch's potion ingredients. It's kinda my holiday present to myself I suppose. Some of these ingredients I bought online and had shipped from around the world, and some I collected from my own imaginary island....anyway, here are my beginnings of my Magical Creature Curio.


My first three items are all magical oddities, potion ingredients perhaps. I found an old antique dark wood wall display to start assembling my odds and ends in.


The first item is a beautiful hank of Silver-white unicorn hair. I found a fabulous woman on Etsy who owns a farm with unicorns, cockatrice, and other manner of domesticated creatures. Unicorn hair is of course great for strengthening spells and healing magic although not as potent as powdered horn.


Here is one a specimen I retrieved myself, grade A phoenix tears. Extremely hard to come by, I was fortunate to collect this vial while hunting for phoenix chicks in the Dark Crags of Metanoia. Phoenix tears are best used in calming spells and to bring good fortune upon a household or persons.


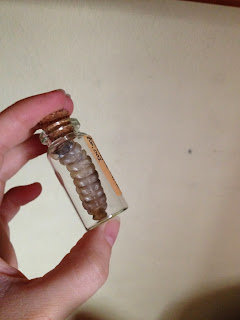
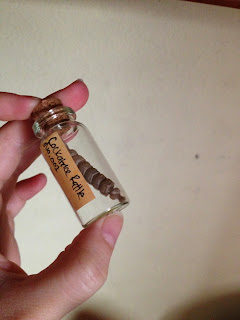
Last but not least a preserved rattle from the tail of the deadly cockatrice. Also sometimes called a basilisk, this creature's toxic venom is so potent it actually calcifies a body from the inside out, giving the appearance that it has been turned to stone. I have yet to discover a practical use for this beast's rattle, but finding one laying perfectly severed in the woods was too much to pass up.


That's all I have to share today, but a handful of new magical creatures will be entering my shop, Lee's Menagerie, later in the week. We're expecting a small shipment of Jewel beetle sprites, young phoenix chicks, and even a dragon hatchling or two, so stay tuned!

Faithfully Yours,
Stefani Lee

Thursday, November 7, 2013

Mandrake Roots

"Magic is, essentially, the higher understanding of nature."


So thus begins the first entry in my catalogue of magical creatures. The very first landmark on the map is a dusky grove of mandrakes I discovered just inland from the beach. I've made a mark on the map so I can return there to gather more mandrake infants when the need arises.


The mandrake root is one of the oldest and best-documented creatures of faerie lore. The root has been used for hundreds of years for its medicinal qualities; a draught made from mandrake root has sedative and pain-killing qualities due to the poison found in the plants. Large doses of the root cause manic, demented behavior and eventually death. Below is the entry I've made in my journal on the subject:


This particular grove was a treasure trove of the various sub-species of the root. I managed to collect a sample of Mandragora Offininarum, Mandragora Autumnalis, the very rare and nearly extinct Mandragora Turcumonica, and even a sample of Podophyllum Petaltum- or the American Mandrake root. I took care to only harvest plants in their infancy as mandrakes are known to cry out when pulled from the earth and an adult plant has a scream fatal to humans. Ear plugs worked just fine against the small ones I collected. 

Here is a display showing the different roots and information about the mandrake root in classical folklore:

These four specimens are looking for a caring home with someone who appreciates magical oddities and raising unconventional pets. Made from polymer clay with a strong wire armature underneath, these cuties have different leaves depending on the sub-species of mandragora they belong to.

Some more pictures of my find:


Visit Lee's Menagerie shop to take home one of these sweet baby roots today!

I'm headed off into the deeper parts of the jungle this weekend, slightly nervous about the type of creature I may discover within.

Wish me luck,
Stefani Lee


Monday, November 4, 2013

The Beginning of a Journey

Happy November Everyone!

Welcome to a brand new month. Personally I love November, what with the weather getting cold and our first smatterings of rain. November is kind of a magical transition between fall and winter (my favorite season).

Since it is a brand spanking new month, I've decided to embark upon a new creative project- something I've been wanting to do for a long time. Bear with me, the explanation may take a few paragraphs...

Ever since I was a child I've had a fantastical island chain living inside my mind. Modeled at first (loosely) on the Galapagos Islands, an area I used to sit and watch endless nature documentaries about during ages 7-14, the islands in my head grew and morphed as I learned more about cryptozoology and the many, many creatures that inhabit faerie islands. In later years my own islands' design has seen influence from the Isle of Avalon of King Arthur fame, and the well-known fairyland Isles of Fortune. My islands and their inhabitants are constantly growing and shifting, changing slightly in shape and content throughout the years as any good faerie island should.

Incidentally, it is from these expansive isles all my creatures and curious magical items come. These islands are home to all my flora and fauna; they are the platform my fantastical beasts live and grow within and I, like any good naturalist, visit there often to observe and learn from the wildlife, only occasionally brining back specimens to this side of the worlds.

Coming back to my current project: for a long time I've wanted to map out the island chain and research the many strange beings found there. So here I go, into the uncharted wilderness of my own dreamland, hoping to bring back to you-all a plethora of information and plenty of unique specimens pulled directly out of my own private ecosystem.

Here's my map of the first island, I've called it Metanoia, meaning: the journey of changing one's mind, heart, self, or way of life. I plan on filling in locations and other interesting non-geographical points as I adventure across the island. The Red X marks where I'll be starting.

As well as fleshing out my map, I also want to keep a naturalist journal, an informational guide if you will, elaborating on the different lifeforms I encounter on this journey, filled with sketches, observations, and background information on each creature I encounter.


Entries to this blog will be posted at the same rate as I am able to acquire specimens for study.
Naturally the specimens will be for sale at Lee's Menagerie as that is the whole purpose of the shop, to sell the items brought back from my journeys!


Wish me luck!
Stefani Lee

Monday, October 28, 2013

Making Zombies

It's official, I finally finished my first ever ball jointed doll!

I photographed the process (if you follow me on facebook you've been seeing the updates about my process this past month)(if you don't follow me on facebook you should start-->Lee's Menagerie)

Incidentally Harlow is for sale in my Etsy store: Lee's Menagerie on Etsy

So Here we go, the whole process of making Harlow, my first zombie doll, out of paperclay:

Here she is- the outer shell of her body and head! Really she started a few steps back as styrofoam cores I sculpted to be the base shapes the clay shell hardened over. I used drinking straws for her neck and limbs to keep them hollow. Wrapping them with floral tape really helped the clay stick to the slippery plastic.


This is after I used an assortment of filing tools to wear down the anatomy marks I drew in pencil. She also has had her pectorals shaped with some clay at this point. I wanted Harlow to be about 11 or 12 years old, so her body shape is half-way between a young child and one just starting puberty.


A side view of the torso. You can see the styrofoam has been removed using an exacto knife. I chose to have her spine actually protruding out of a wound in the flesh (she is a zombie after all....) so you can see the bumps taking form here. I made sure to only take away clay with the file instead of adding fresh clay to create the vertebrae in order to keep her proportions correct.

Now some limbs start to form! The base of the limbs is clay wrapped around a straw. The joints are the most difficult part to make.....I had to make each on individually by wrapping wooden beads in clay, letting them dry, then cut the dried shell in half with an exacto knife to remove to bead. After all that the two halves have to be super glued back together and set in the proper place with another layer of clay.

Also her head is starting to take shape here- she even has an eyeball!


Here's the finished body and head. The last bits to be added are the flesh texture around the exposed skull and other bones. Just a couple more tweaks and she'll be ready for painting!


Here are her torso and head after their first base coat. I did about 5 coats of my mixture containing acrylic paint, modeling paste, gesso, and a little water. Because Ladoll paperclay is not baked in a kiln, it's really important that she gets an even and thick base coat to seal her from moisture and potential damage down the road.


You can really see the difference between the first coat and the finished basecoat color. I know some artists like to use airbrush technique to spray on their skintone, but I like the texture you get from a soft paintbrush. Gives the dolls a vintage feel.


Looking at her back you can see some of the zombie wounds starting to take shape. After the color shading is done it will look much more believable.


Here's her head with all the flesh and bone shaded! I'm most proud of her teeth; they are transparent polymer clay that was pre-baked and glued into the jaw.


She's still waiting to be blushed (the technique used to add skintone to her face and body)


There we go, the pink and red hues make the otherwise flat skintone pop. She's starting to look alive! (or undead I suppose)


It's worth noting that dark shading has also been added by layering dark green under a opaque layer of the base coat. It's noticeable around her pectorals and hip lines.


Yes I blushed the back of her head even though it will never be seen ones her hair is glued in place. Its easy to get carried away dabbling with the blushing sponge.


Speaking of hair, Harlow has some now! I add the hair from the base of the skull up one layer at a time. First I make a line of frabritac glue then I press the ends of the hair in gently till they stick. Rise my fingers and repeat until she has a full head of hair!


I left the hair sparse around her forehead in purpose. She doesn't have nearly as much hair as she used to when she was alive after all.


I forgot to mention this is what her limbs look like while drying. Before I string her together each piece needs to be fully painted and sealed with a strong matte ceramic sealer separately. All the different sealers help strengthen the finished doll.


And there we go! The finished, sealed doll is strung together with elastic! She ends up being fully posable except for her ankle joints which encountered a problem during the stringing phase and has to be set in place with epoxy resin. Oh well, not bad for a first doll =)


Below are a few pictures of her wearing her handmade (and fully removable) clothes.


Thanks for reading,
Stefani Lee