I photographed the process (if you follow me on facebook you've been seeing the updates about my process this past month)(if you don't follow me on facebook you should start-->Lee's Menagerie)
Incidentally Harlow is for sale in my Etsy store: Lee's Menagerie on Etsy
So Here we go, the whole process of making Harlow, my first zombie doll, out of paperclay:
Here she is- the outer shell of her body and head! Really she started a few steps back as styrofoam cores I sculpted to be the base shapes the clay shell hardened over. I used drinking straws for her neck and limbs to keep them hollow. Wrapping them with floral tape really helped the clay stick to the slippery plastic.
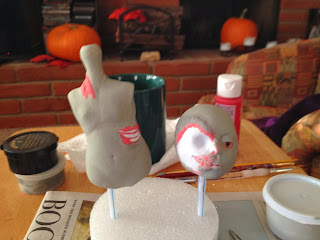
This is after I used an assortment of filing tools to wear down the anatomy marks I drew in pencil. She also has had her pectorals shaped with some clay at this point. I wanted Harlow to be about 11 or 12 years old, so her body shape is half-way between a young child and one just starting puberty.
A side view of the torso. You can see the styrofoam has been removed using an exacto knife. I chose to have her spine actually protruding out of a wound in the flesh (she is a zombie after all....) so you can see the bumps taking form here. I made sure to only take away clay with the file instead of adding fresh clay to create the vertebrae in order to keep her proportions correct.
Now some limbs start to form! The base of the limbs is clay wrapped around a straw. The joints are the most difficult part to make.....I had to make each on individually by wrapping wooden beads in clay, letting them dry, then cut the dried shell in half with an exacto knife to remove to bead. After all that the two halves have to be super glued back together and set in the proper place with another layer of clay.
Also her head is starting to take shape here- she even has an eyeball!
Here's the finished body and head. The last bits to be added are the flesh texture around the exposed skull and other bones. Just a couple more tweaks and she'll be ready for painting!
Here are her torso and head after their first base coat. I did about 5 coats of my mixture containing acrylic paint, modeling paste, gesso, and a little water. Because Ladoll paperclay is not baked in a kiln, it's really important that she gets an even and thick base coat to seal her from moisture and potential damage down the road.
You can really see the difference between the first coat and the finished basecoat color. I know some artists like to use airbrush technique to spray on their skintone, but I like the texture you get from a soft paintbrush. Gives the dolls a vintage feel.
Looking at her back you can see some of the zombie wounds starting to take shape. After the color shading is done it will look much more believable.
Here's her head with all the flesh and bone shaded! I'm most proud of her teeth; they are transparent polymer clay that was pre-baked and glued into the jaw.
She's still waiting to be blushed (the technique used to add skintone to her face and body)
There we go, the pink and red hues make the otherwise flat skintone pop. She's starting to look alive! (or undead I suppose)
It's worth noting that dark shading has also been added by layering dark green under a opaque layer of the base coat. It's noticeable around her pectorals and hip lines.
Yes I blushed the back of her head even though it will never be seen ones her hair is glued in place. Its easy to get carried away dabbling with the blushing sponge.
Speaking of hair, Harlow has some now! I add the hair from the base of the skull up one layer at a time. First I make a line of frabritac glue then I press the ends of the hair in gently till they stick. Rise my fingers and repeat until she has a full head of hair!
I left the hair sparse around her forehead in purpose. She doesn't have nearly as much hair as she used to when she was alive after all.
I forgot to mention this is what her limbs look like while drying. Before I string her together each piece needs to be fully painted and sealed with a strong matte ceramic sealer separately. All the different sealers help strengthen the finished doll.
And there we go! The finished, sealed doll is strung together with elastic! She ends up being fully posable except for her ankle joints which encountered a problem during the stringing phase and has to be set in place with epoxy resin. Oh well, not bad for a first doll =)
Below are a few pictures of her wearing her handmade (and fully removable) clothes.
Thanks for reading,
Stefani Lee


No comments:
Post a Comment